Nginx 学习笔记(二)Web 服务启用 HTTP/2
本文共 4973 字,大约阅读时间需要 16 分钟。
个人网站提升为HTTP2.0协议,加速访问
一、条件
1、openssl的版本必须在1.0.2e及以上
2、nginx的版本必须在1.9.5以上
二、编译安装
1、openssl 编译安装
(1)开始
wget --no-check-certificate https://www.openssl.org/source/openssl-1.0.2j.tar.gztar zxvf openssl-1.0.2j.tar.gzcd openssl-1.0.2j./config shared zlibmake && make installmv /usr/bin/openssl /usr/bin/openssl.oldmv /usr/include/openssl /usr/include/openssl.oldln -s /usr/local/ssl/bin/openssl /usr/bin/opensslln -s /usr/local/ssl/include/openssl /usr/include/opensslecho "/usr/local/ssl/lib" >> /etc/ld.so.confldconfig -v
注:
(2)查看openssl版本
www@TinywanAliYun: openssl versionOpenSSL 1.0.2j 26 Sep 2016
232
2、重新编译Openresty
(1)本次将下载最新版本:
wget https://openresty.org/download/openresty-1.13.6.1.tar.gztar zxvf openresty-1.13.6.1.tar.gz cd openresty-1.13.6.1/
(2)修改加载openssl 方式
vim /home/www/build/openresty-1.13.6.1/bundle/nginx-1.13.6/auto/lib/openssl/confvim /home/www/build/openresty-1.13.6.1/build/nginx-1.13.6/auto/lib/openssl/conf
修改后内容,注意:这里是修改为两个不同目录的openssl的配置文件
# 修改前:#CORE_INCS="$CORE_INCS $OPENSSL/.openssl/include"#CORE_DEPS="$CORE_DEPS $OPENSSL/.openssl/include/openssl/ssl.h"#CORE_LIBS="$CORE_LIBS $OPENSSL/.openssl/lib/libssl.a"#CORE_LIBS="$CORE_LIBS $OPENSSL/.openssl/lib/libcrypto.a"# 修改前:CORE_INCS="$CORE_INCS $OPENSSL/include"CORE_DEPS="$CORE_DEPS $OPENSSL/include/openssl/ssl.h"CORE_LIBS="$CORE_LIBS $OPENSSL/lib/libssl.a"CORE_LIBS="$CORE_LIBS $OPENSSL/lib/libcrypto.a"
我这里是直接注释掉,添加新的

(3)重新编译Openresty ,添加–with-openssl参数
./configure \--user=www \--group=www \--prefix=/usr/local/openresty \--with-luajit \--with-http_v2_module \--with-http_realip_module \--with-http_mp4_module \--with-stream \--with-http_gzip_static_module \--with-http_ssl_module \--with-openssl=/usr/local/ssl \--with-openssl-opt="enable-tlsext" \--without-http_redis2_module \--with-http_iconv_module \--with-http_stub_status_module \--with-http_xslt_module \--add-dynamic-module=/home/www/build/nginx-ts-module \--add-dynamic-module=/home/www/build/nginx-rtmp-module \--add-dynamic-module=/home/www/build/nginx-module-vts \--add-module=/home/www/build/ngx_cache_purge-2.3 \ ... ... make
注意:这里只要编译就可以啦,没必要make install (会覆盖原来已经安装好的内容)
(4)修改Nginx 二进制文件,如果Nginx服务正在运行,必须停止,否则无法覆盖
首先备份二进制文件一份:
cp /usr/local/openresty/nginx/sbin/nginx /usr/local/openresty/nginx/sbin/nginx.old
覆盖旧二进制文件
cp -f /home/www/build/openresty-1.13.6.1/build/nginx-1.13.6/objs/nginx /usr/local/openresty/nginx/sbin/nginx
如果动态编译了其他模块或者同一个模块的不同版本,则同上一并复制过去
cp -f /home/www/build/openresty-1.13.6.1/build/nginx-1.13.6/objs/ngx_rtmp_module.so /usr/local/openresty/nginx/modules/ngx_rtmp_module.socp -f /home/www/build/openresty-1.13.6.1/build/nginx-1.13.6/objs/ngx_http_ts_module.so /usr/local/openresty/nginx/modules/ngx_http_ts_module.socp -f /home/www/build/openresty-1.13.6.1/build/nginx-1.13.6/objs/ngx_http_vhost_traffic_status_module.so /usr/local/openresty/nginx/modules/ngx_http_vhost_traffic_status_module.so
(5)重启服务,查看配置信息
sudo systemctl start nginx
配置详情
www@TinywanAliYun:~/build/openresty-1.13.6.1/build/nginx-1.13.6/objs$ sudo /usr/local/openresty/nginx/sbin/nginx -Vnginx version: openresty/1.13.6.1built by gcc 5.4.0 20160609 (Ubuntu 5.4.0-6ubuntu1~16.04.4) built with OpenSSL 1.0.2j 26 Sep 2016TLS SNI support enabledconfigure arguments: --prefix=/usr/local/openresty/nginx --with-cc-opt=-O2 --add-module=../ngx_devel_kit-0.3.0 --with-ld-opt=-Wl,-rpath,/usr/local/openresty/luajit/lib --user=www --group=www --with-http_v2_module --with-http_realip_module --with-http_mp4_module --with-stream --with-http_ssl_module --with-openssl=/usr/local/ssl --with-openssl-opt=enable-tlsext --with-http_stub_status_module --with-http_xslt_module --add-dynamic-module=/home/www/build/nginx-ts-module --add-dynamic-module=/home/www/build/nginx-rtmp-module --add-dynamic-module=/home/www/build/nginx-module-vts --add-dynamic-module=/home/www/build/ngx_cache_purge-2.3 --with-stream --with-stream_ssl_module --user=www --group=www --with-http_v2_module --with-http_ssl_module --with-openssl=/usr/local/ssl --with-openssl-opt=enable-tlsext --with-http_stub_status_module --with-http_xslt_module --add-dynamic-module=/home/www/build/nginx-ts-module --add-dynamic-module=/home/www/build/nginx-rtmp-module --add-dynamic-module=/home/www/build/nginx-module-vts --add-dynamic-module=/home/www/build/ngx_cache_purge-2.3 --with-stream --with-stream_ssl_module
三、配置Nginx.conf
server { listen 443 ssl http2; server_name www.tinywan.com; set $root_path /home/www; root $root_path; ssl on; ssl_certificate /etc/letsencrypt/live/www.tinywan.com/fullchain.pem; ssl_certificate_key /etc/letsencrypt/live/www.tinywan.com//privkey.pem; server_tokens off; location / { if (!-e $request_filename) { rewrite ^(.*)$ /index.php?s=/$1 last; break; } }} 四、测试
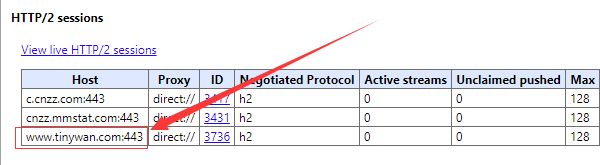
1、测试工具,Chrome 的 Net-internals 工具 (Chrome 中通过 chrome://net-internals/#http2 可以访问)
2、测试结果


浏览器Header 请求头变化

五、参考文章
1、
3、
4、
5、
6、
7、
8、
9、
10、
转载地址:http://asonl.baihongyu.com/
你可能感兴趣的文章
使用MyBatis Generator自动生成DAO以及实体类
查看>>
我的友情链接
查看>>
指向结构体数组的指针 学习笔记
查看>>
Java学习笔记----Socket
查看>>
专业的电脑网速测试网站
查看>>
修改linux用户的可以打开的最大文件数和进程数(fork: retry: Resource temporarily unavailable)...
查看>>
某企业AD Exchange服务器恢复案例
查看>>
使用Wireshark来检测一次HTTP连接过程
查看>>
Linq to SharePoint与权限提升
查看>>
LVS负载均衡架设,DR模式
查看>>
js中访问SqlServer数据库
查看>>
批处理for语句详解
查看>>
zabbix部署(二)
查看>>
理解Socket通信中的Input和Output
查看>>
1.3-Linux基础命令
查看>>
Keepalived安装配置
查看>>
韩遭史上最大规模****** 3500万客户信息泄露
查看>>
Building a Dynamic UI with Fragments
查看>>
vue中的数据绑定
查看>>
css中tabel-cell属性的简单总结
查看>>